crownliner
CROWN LINER REMOVAL/INSTALLATION

- 1. Remove the cheek pads.
- 2. At the back of the helmet pull the crown liner away from the shell unsnapping the two snaps.
- 3. Pull the crown liner out of the helmet while gently detaching it from the forehead channel.
- Reverse this process for installation.
cheekpads
CHEEK PAD & NECK ROLL REMOVAL

Slide your finger between the cheek pad and the helmet interior wall, and gently tug it away. Make sure all buttons are unsnapped.
Repeat the process for both sides to remove the cheek pad.
CHEEK PAD & NECK ROLL INSTALLATION

When you install the cheek pad, it is easier to completely assemble one side first to set up a reference point.
Then slowly put the plastic sleeve of the cheek pad into the gap starting from one side (where you assembled the cheek pad) to the other side by way of the back of the helmet following the rubber trim channel.
After making sure the cheek pad sleeve sit at the right position, assemble cheek button on the other side to finish the installation.
aeroskirt
AERO SKIRT REMOVAL/INSTALLATION

- 1. To remove the aero skirt, simply tug on the aero skirt and it slides out of the rubber trim channel.
- 2. To install it, it is easier to put the tip (A) into the rubber trim channel first, and then put the sides (B) and (C) into it.
chinstrap
HOW TO USE CHINSTRAP

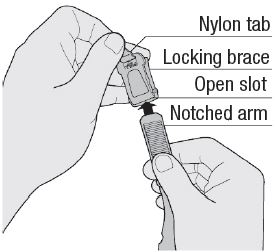
- 1. While you are wearing your helmet, grasp the notched arm of the chinstrap with your right hand, and the locking mechanism with your left hand.
- 2. Pull the nylon tab with your thumb and forefinger to open the locking brace.
- 3. Insert the notched arm into the slot.
- 4. Release the nylon tab to lock the arm in place. Adjust as needed.

